


Realms is a new product that opens up a different approach to managing people in Okta’s Universal Directory. It introduces flexibility to managing users no matter how your business is growing. Whether this occurs through natural growth, M&A, or the introduction of new business units, the ability to seamlessly manage and delegate management of these different user populations is crucial as a business scales.
With Realms, central IT admins can delegate and facilitate user management and improve organizational complexity by centralizing identities within a single Okta org and reducing the dependency on groups or multiple orgs. Below, we’ll walk through one way Realms can be used to manage multiple business units and how you can apply it to your own unique use case. (Read another blog from Dipt Kanthilal for a foundational background on Realms.)
Getting started: Enabling Realms
Realms is currently available through Self Service in Early Availability via Okta Identity Governance. To get started, navigate through the following steps:
- On the left navigation of the Admin Console, select “Settings.”
- Select “Features.”
- Enable Realms.
Once Realms is enabled, we can begin configuration for the example use case with the following steps:
- Create Realms.
- Set up Realms Assignments.
- Delegate management to Realms Admins.
- Create Access Certification campaigns on specific Realms.
- Set up Realms Authentication Policies.
- Automate Realms management using Workflows.
Scenario: Windrides Aviation
Background: Let’s put Realms into action. Windrides is a fictitious aviation company that has expanded their business from focusing on commercial aviation to adding in additional business lines like leasing private jets and cabin crew sourcing. Introducing two new major businesses to the organization has put a lot of strain on the IT team in managing users, their access, and their day-to-day IT needs. They have common application needs for similar job functions across their different businesses in different geographical regions. Windrides has heard about Realms and is excited to leverage this new feature.
Current deployment: Windrides currently uses groups to model and manage application access. Because of the crossover in user populations in groups, admins are having a hard time managing users from different regions. Take the scenario below, depicting the current structure to manage various engineering groups, based on region.
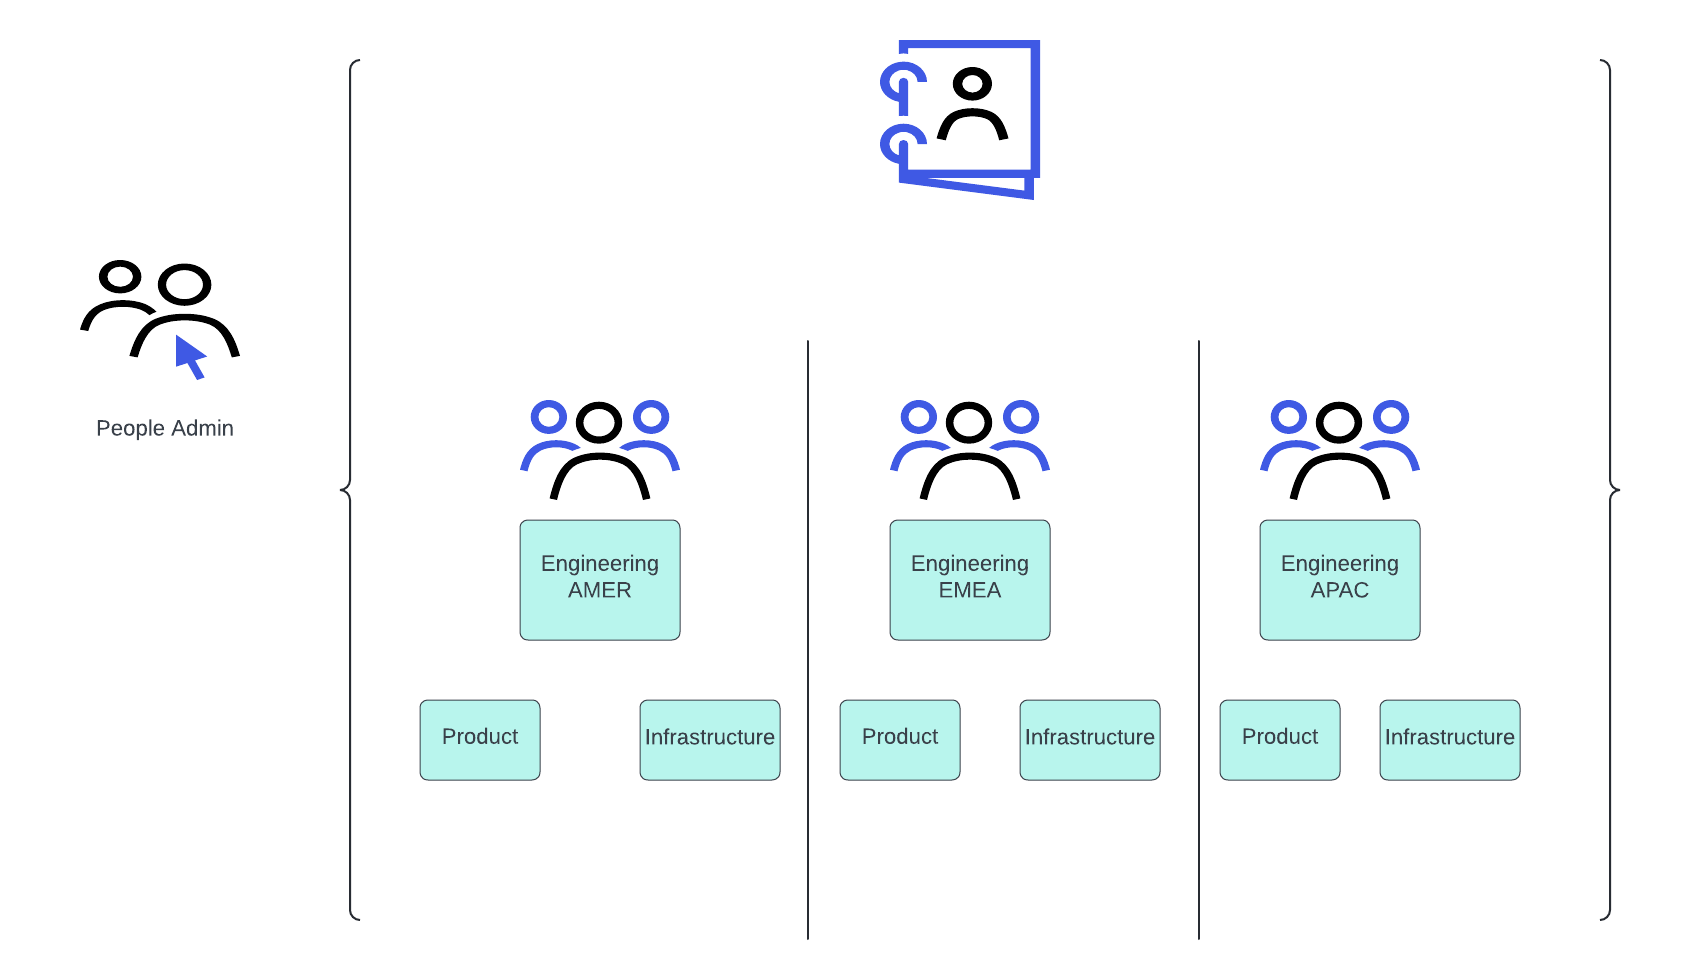
Desired end-state: With Realms, WindRides wants to create one functional group for engineering across regions for shared application access while segmenting out distinct user populations.
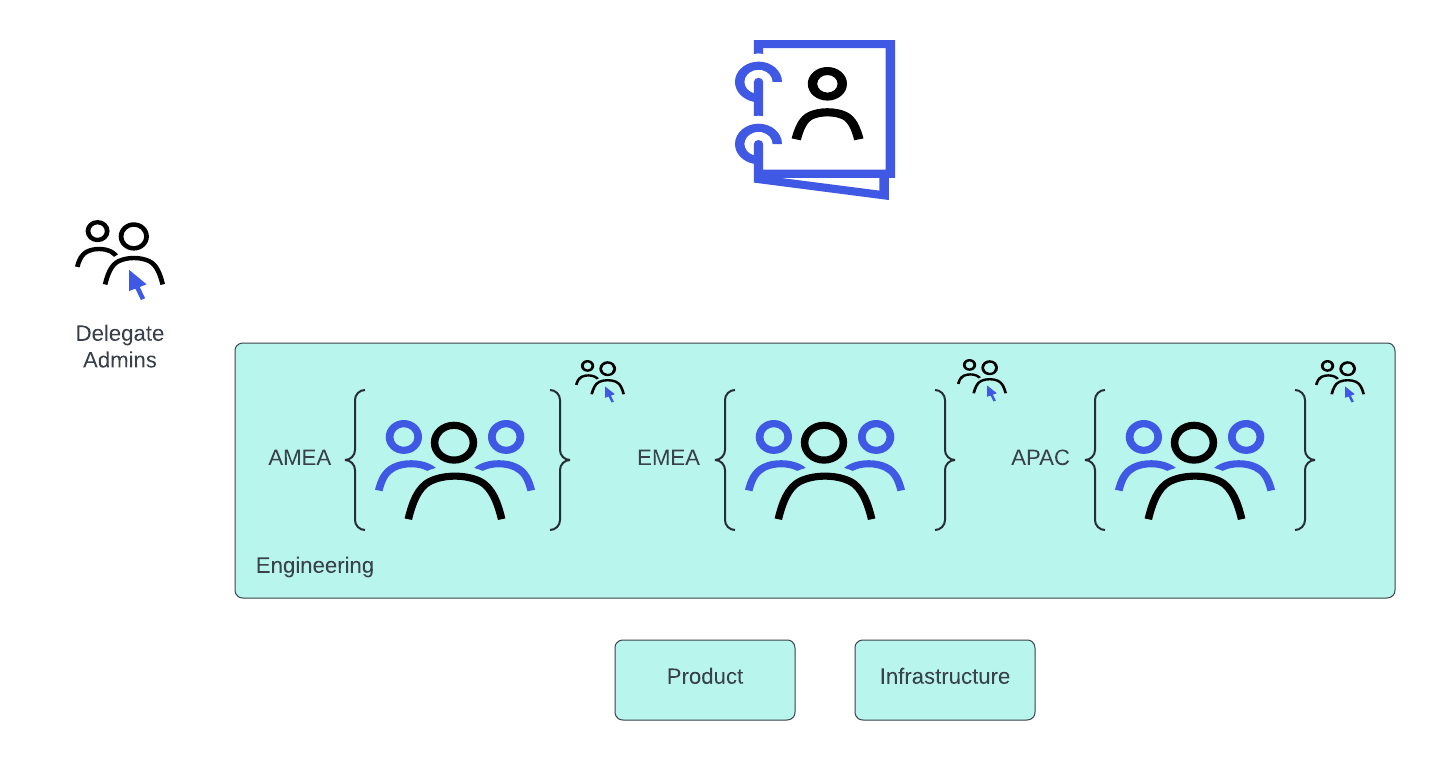
By adopting this model, the central WindRides IT admins can reduce their user and group management overhead and easily delegate user management to regional admins. Additional groups can be created for more specific application access, but this prevents the proliferation of regional groups that all define the same app access.
Create realms
Once Realms has been enabled in the org, a new section entitled “Realms” will be available under “Directory” in the left navigation of the Admin Console.
First, navigate to the “Realms” section to create realms. Following the Windrides scenario, we will create three realms: Engineering AMER, Engineering EMEA, and Engineering APAC.
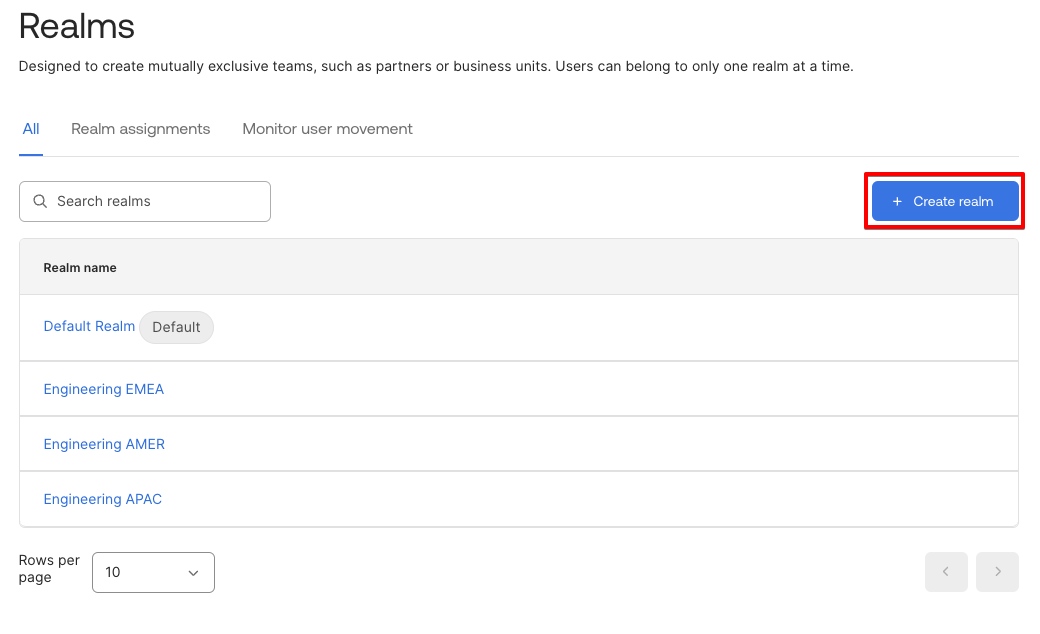
In addition to the three realms, there’s a Default Realm as a catch-all. Existing users will start out in the Default Realm but can easily be moved at a later time. The Realms can also be created via API or Workflows.
Realm assignment
As stated above, users must belong to a realm. Existing users will start out in the Default Realm and can be moved individually to other realms. With the new “realm assignments,” users can be automatically onboarded into the correct realm. Realm assignments can also be leveraged to bulk move users from one realm to another.
Individual user movement
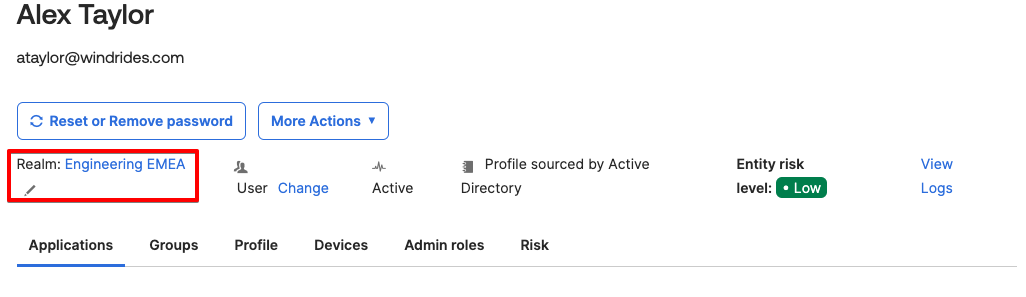
On an individual’s user profile, by clicking the pencil icon, a user can be moved from one realm to another. Alex Taylor, shown below, is currently in the default realm, but needs to be a part of the Engineering EMEA realm. By using the pencil icon, Alex can be moved to the desired realm.
To move users at scale, the better option is to leverage “Realm assignments.”
How to use realm assignments
Within the Realms view, there’s a view entitled “Realm assignments.” As a backup, there’s a default “Catch-all realm assignment”, but WindRides needs more specific realm assignments tied to their three custom realms.
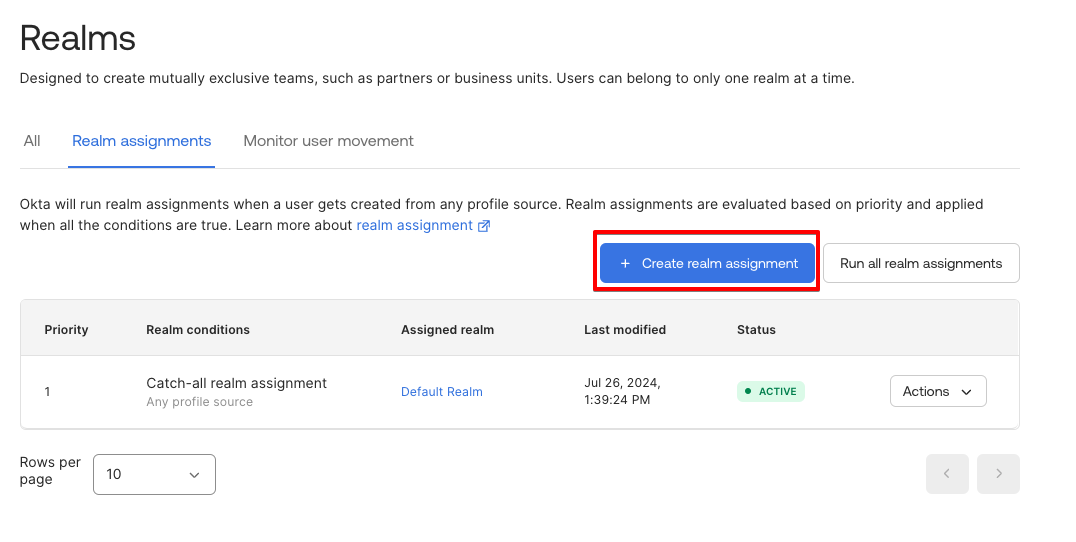
When creating a realm assignment, there are multiple pieces of information that help ensure a user is created or onboarded into the correct realm. This includes:
Realm assignment name | This is the name associated with the realm assignment for easy reference |
Profile source | The profile source of truth for users within the organization, this can be Okta, directories, HR sources or other recognized profile sources. |
Priority | Keep current :Priority at bottom Bring to front :Priority at top
This helps resolve conflicts between realm assignments. |
Scope | If a single profile source needs to point to multiple realms, user profile attributes help add additional parameters to the realm assignment. |
Assign to realm | The desired target realm |
For WindRides, we will create three realm assignments to automate onboarding and ease movement of users, leveraging profile source and Expression Language as part of the scope.
Expression Language will allow for the combination of two attributes to drive the realm assignment scope: Organization = Regions and Department = Engineering
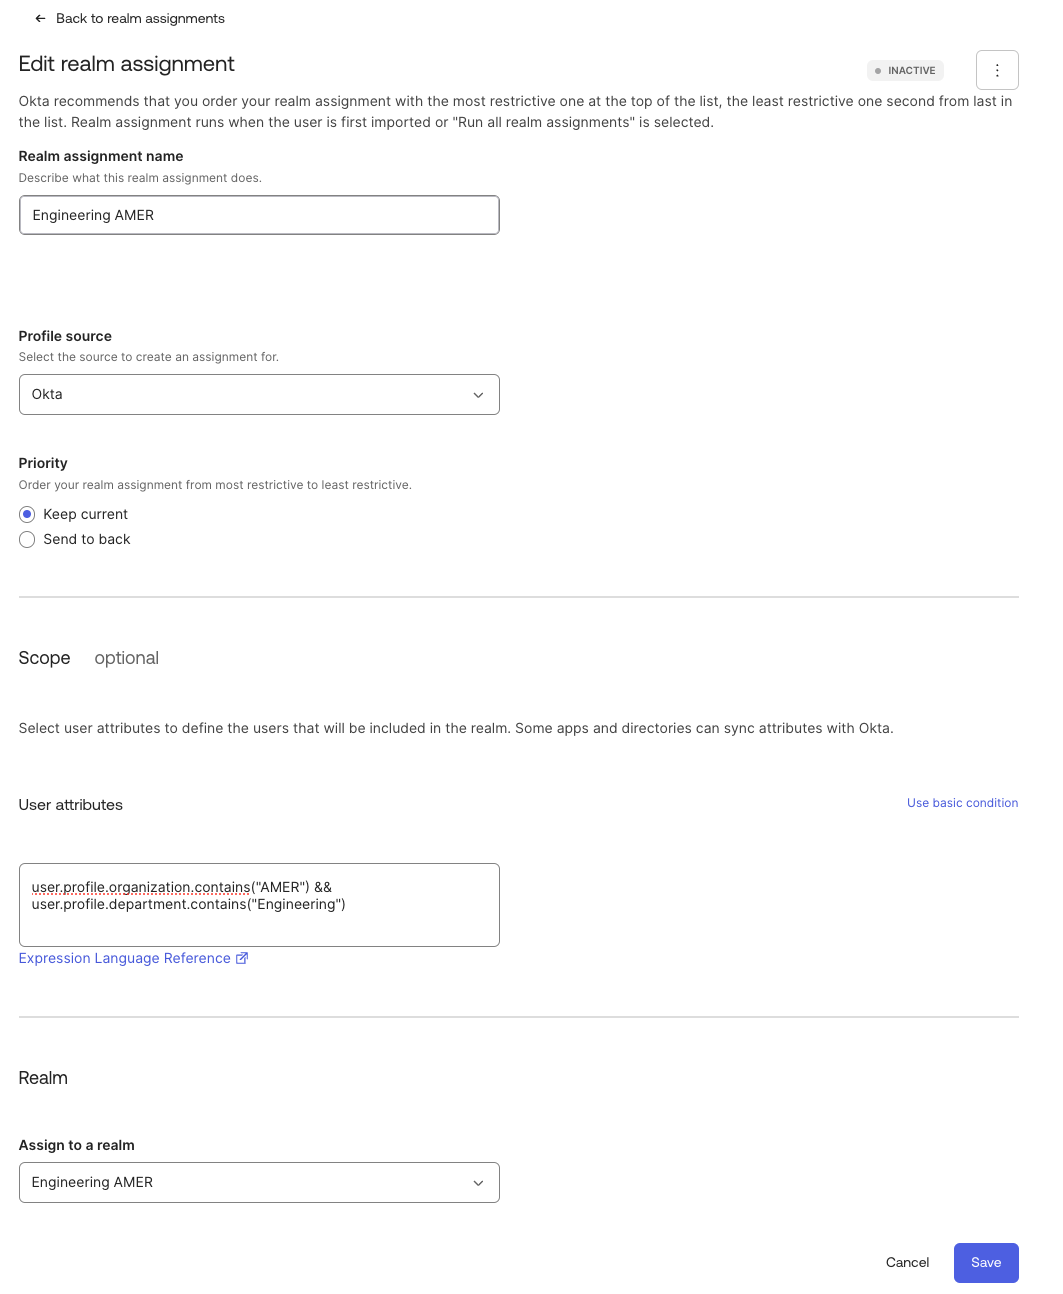
Once a realm assignment is created, it must be activated (similar to group rules). To activate, navigate to the “Actions” menu, and then “Activate.”
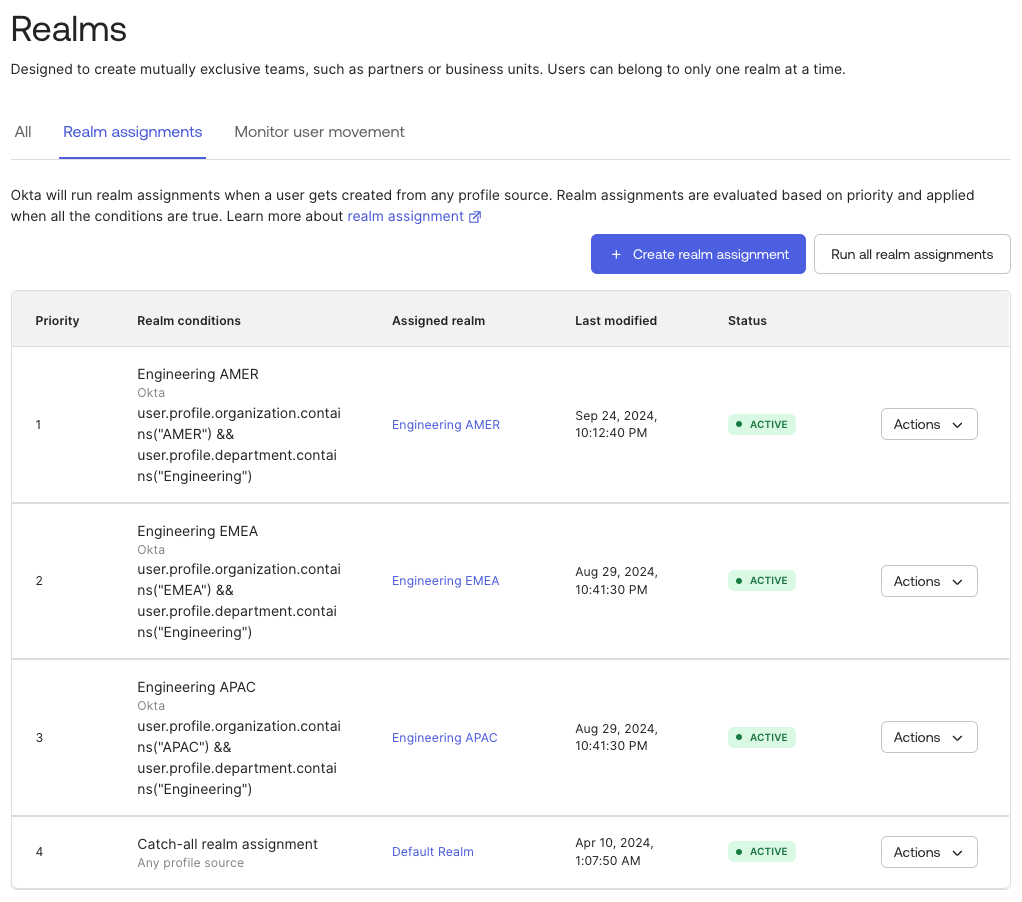
The realm assignment will run automatically for any new user created after activation. To execute the realm assignment for any existing user, select “Run” or “Run All Realm Assignments.” The status of the job can be monitored under the “Monitor User Movement” tab.
By running the realm assignments, all users in the org should now be in the correct realms.
Delegate admins
One of the key benefits of Realms is the ability to delegate user management. The next step for the WindRides team is to set up admin roles.
Step 1: Create Role
Under the “Administrators” view, the first step is to create a role for the delegated admin. At a minimum, delegated realm admins will need access to user- and realm-related permissions. Additionally, group and application permissions are optional and can be assigned as needed. Below is an example of the permissions that can be assigned:
Permission Name | Permission sets |
User | Manage users Contains all user permissions |
Realms | View realms and their details |
Application | Edit application's user assignments |
WindRides wants to delegate the same permissions to all Realms administrators, so they only need to create one role.
Create a new role under Security > Administrators > Roles
Step 2: Create resource sets
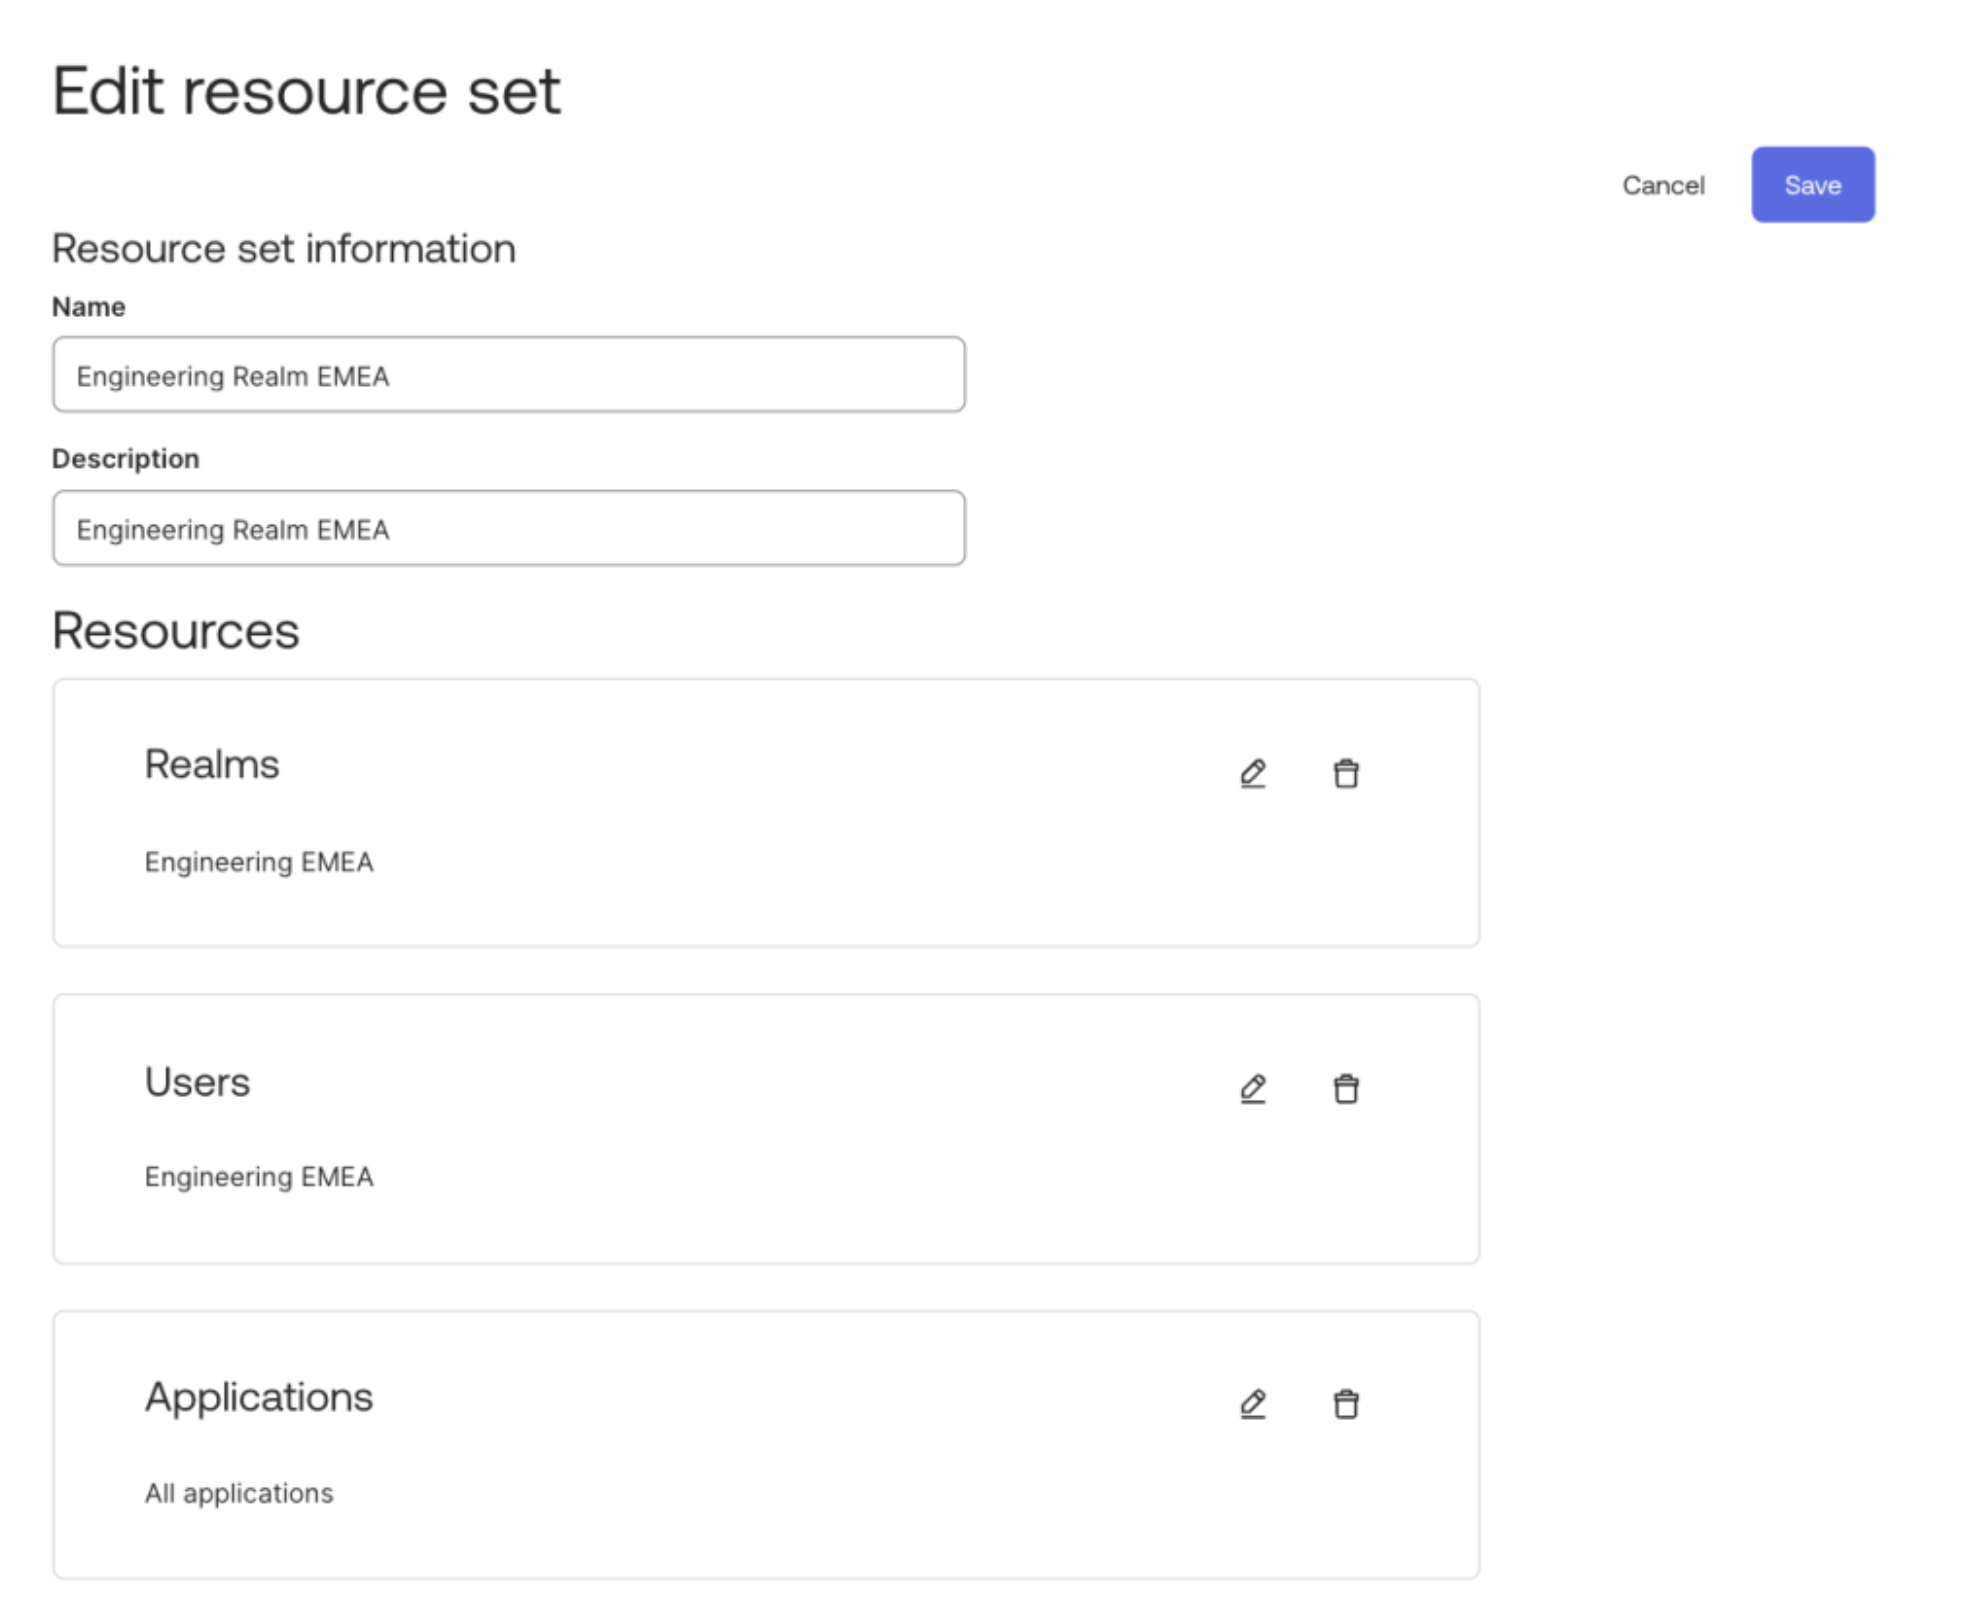
Resource sets define the resources for which management is being delegated. Three different resource sets will need to be created to align with the three realms that need to be managed.
In the WindRides scenario, we will create individual resource sets for Engineering AMER, Engineering EMEA, and Engineering APAC. These resource sets will include users, realms, and applications.
Create a new resource under Security > Administrators > Resources
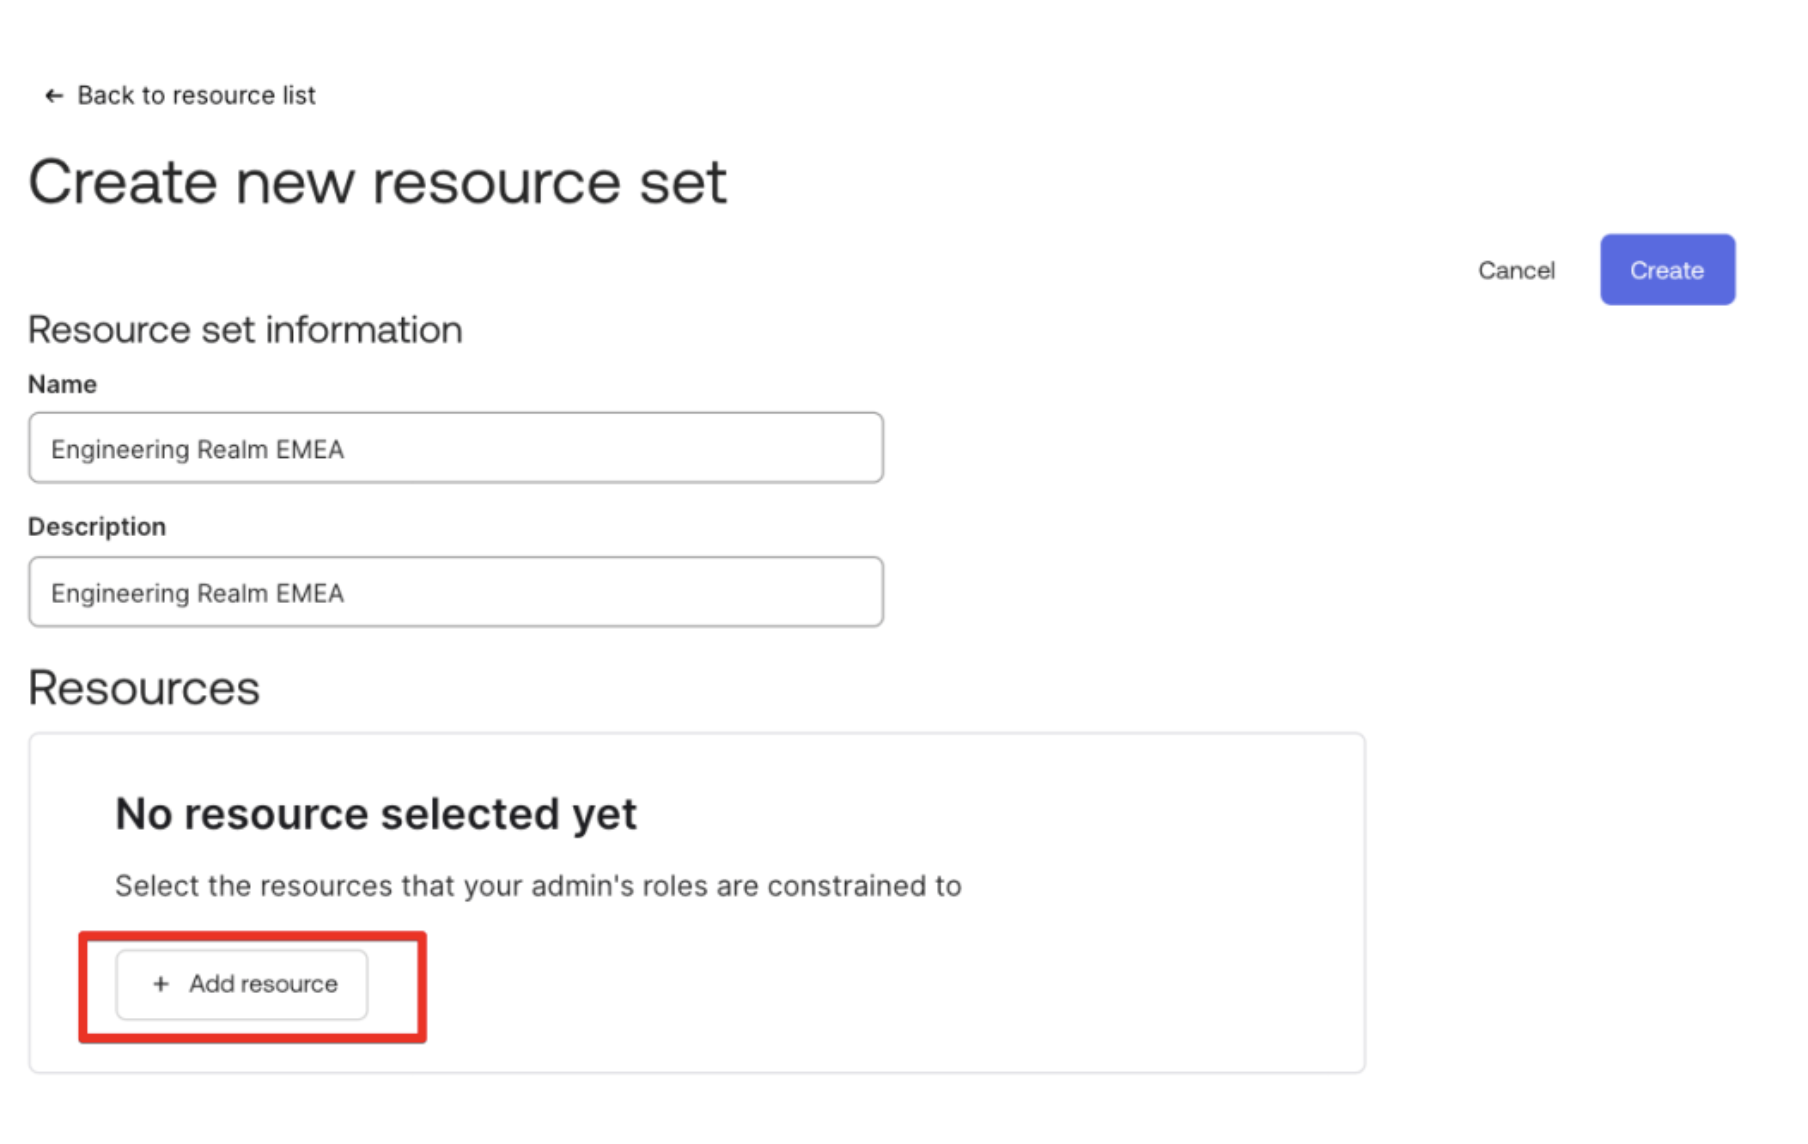
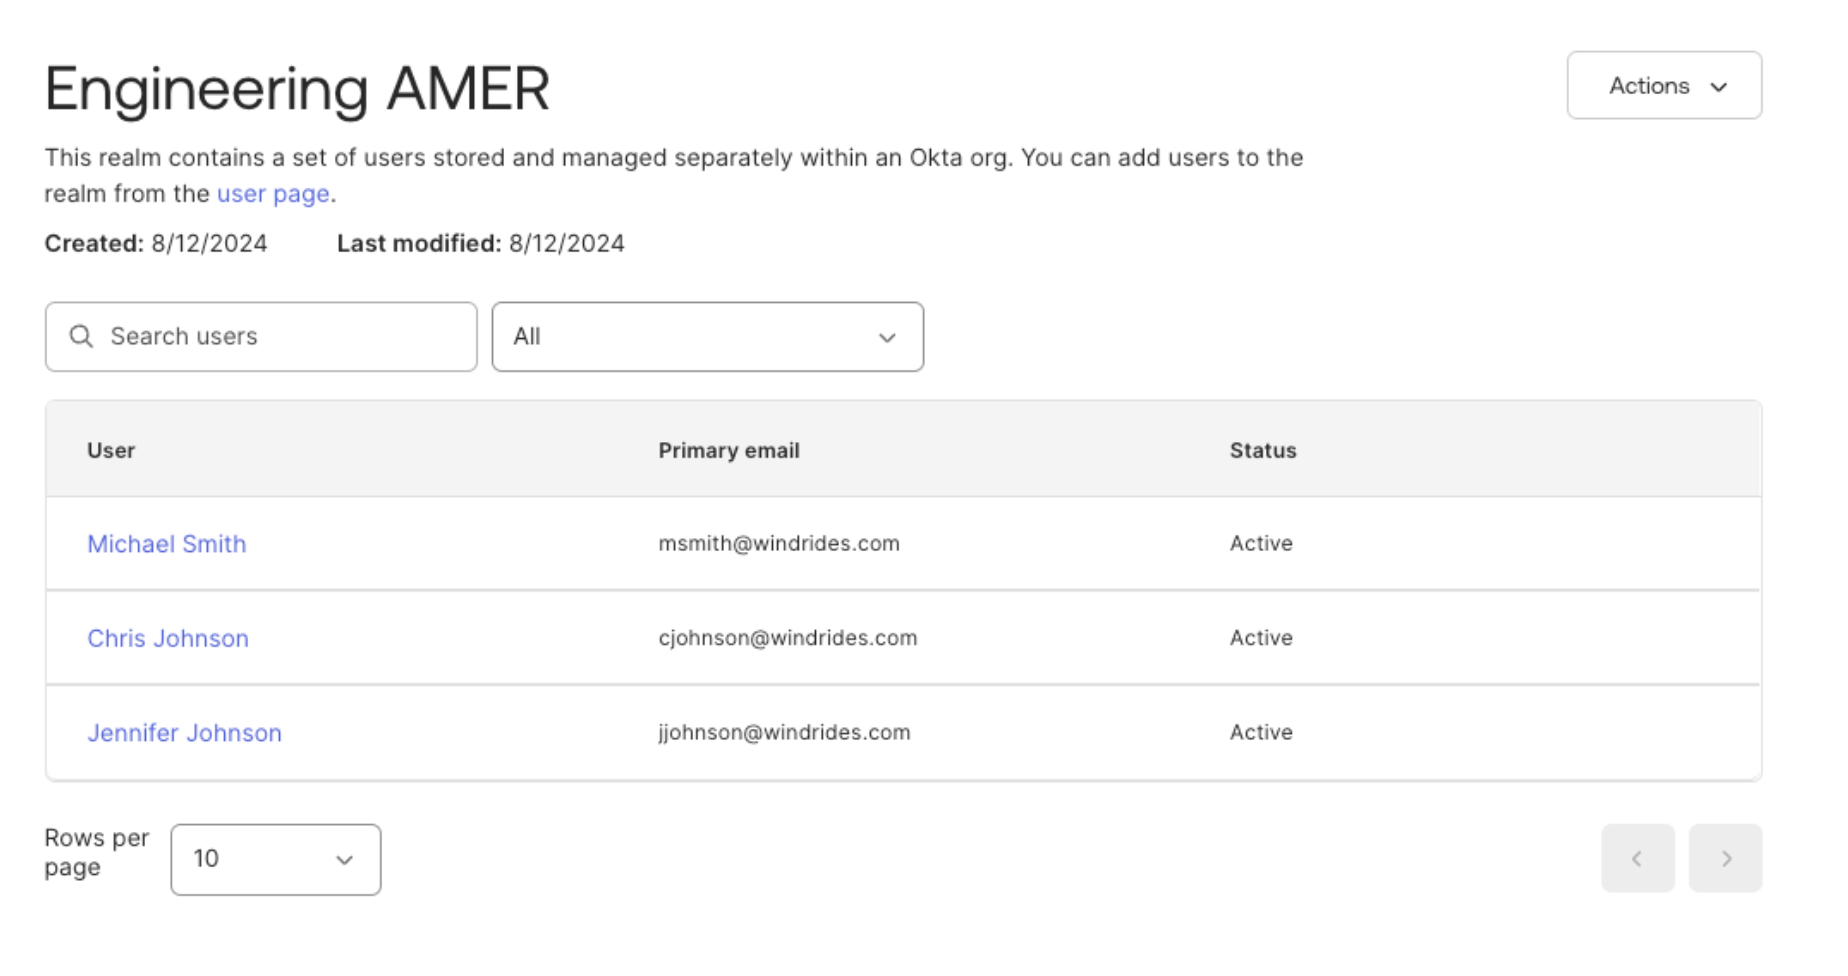
For users, we will select “Users in realm” and then select the specific realm to be included. This defines the set of users we will see on the “People” page.
Adding the “Realms” resource set drives which realms can be viewed and managed by the delegated administrator. Adding an application as a part of the resource set indicates which applications the delegated administrator can manage. Note that because of the “Users in realm” selection, the delegated administrator will only be able to view, assign, and unassign users to the application that belong to the realm that they can manage.
As WindRides has three different realms, we will need to create three resource sets to define the user populations each administrator can manage.

Step 3: Administrator Assignment
Now that the role and resource set have been defined, the final step is to associate both with a user who will become a delegated administrator. The user can first be selected, alongside the role and resource set to complete the delegation.

Delegate Admin User Experience

In this video, the admin is able to manage only the users in the realm “Engineering EMEA.” Based on the permissions assigned, they can create users, manage lifecycle, and assign or unassign applications to the users within the realm.
Okta Identity Governance access certification campaign
With realm assignments, WindRides can automate the creation of users in the right realms. With the custom admin role framework, Windridescan delegate management of those users. Another crucial part of user management is governance, to review which users have access to which resources and evaluate if that access should be retained. Using Okta Identity Governance, WindRides can create certification campaigns that can be assigned to users who are realm admins. In this way, the delegated admins can be assigned reviews for users within the realm they manage for ongoing governance.
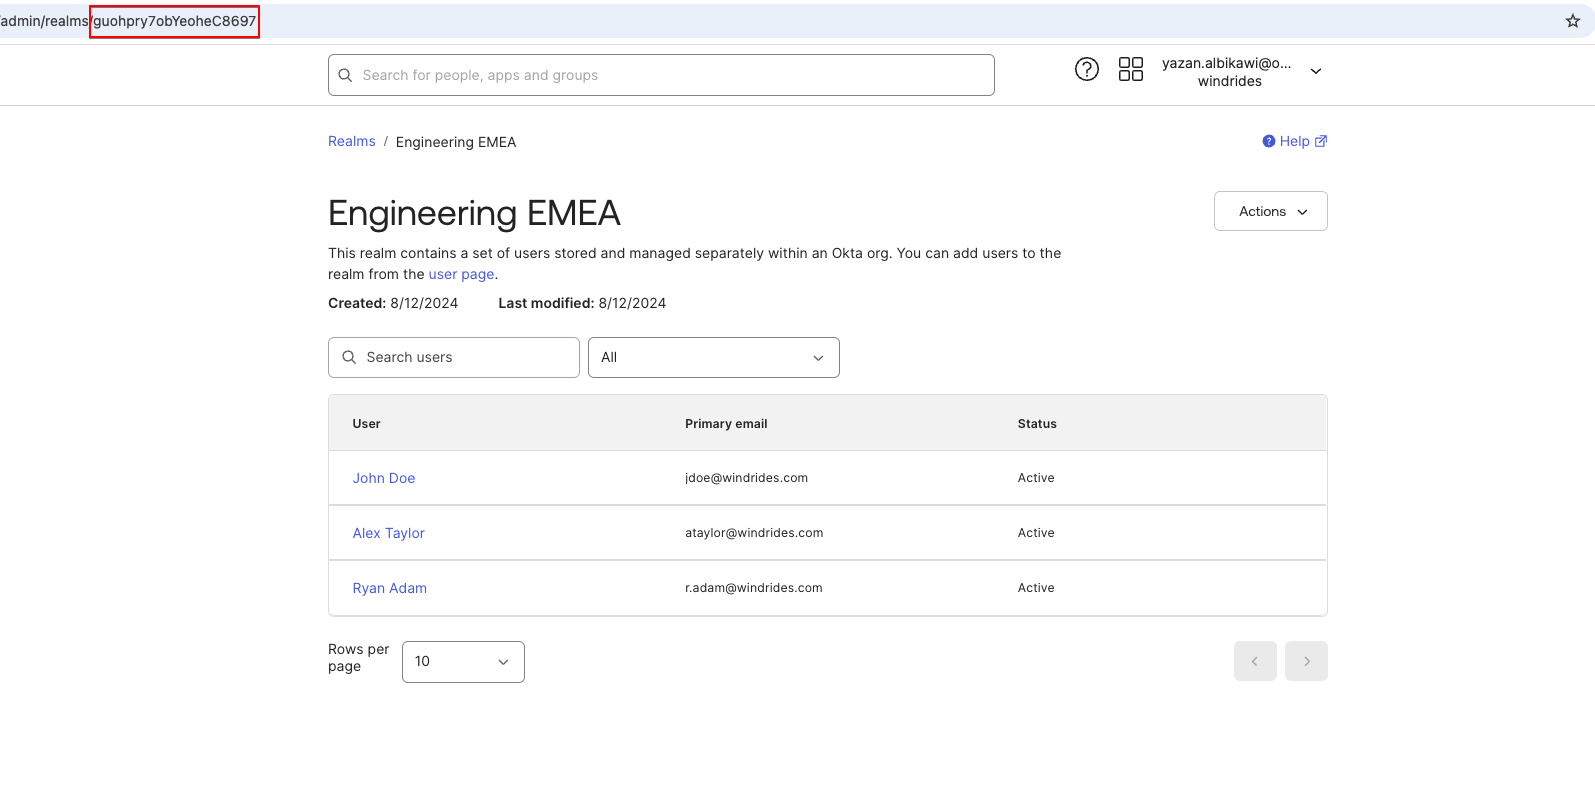
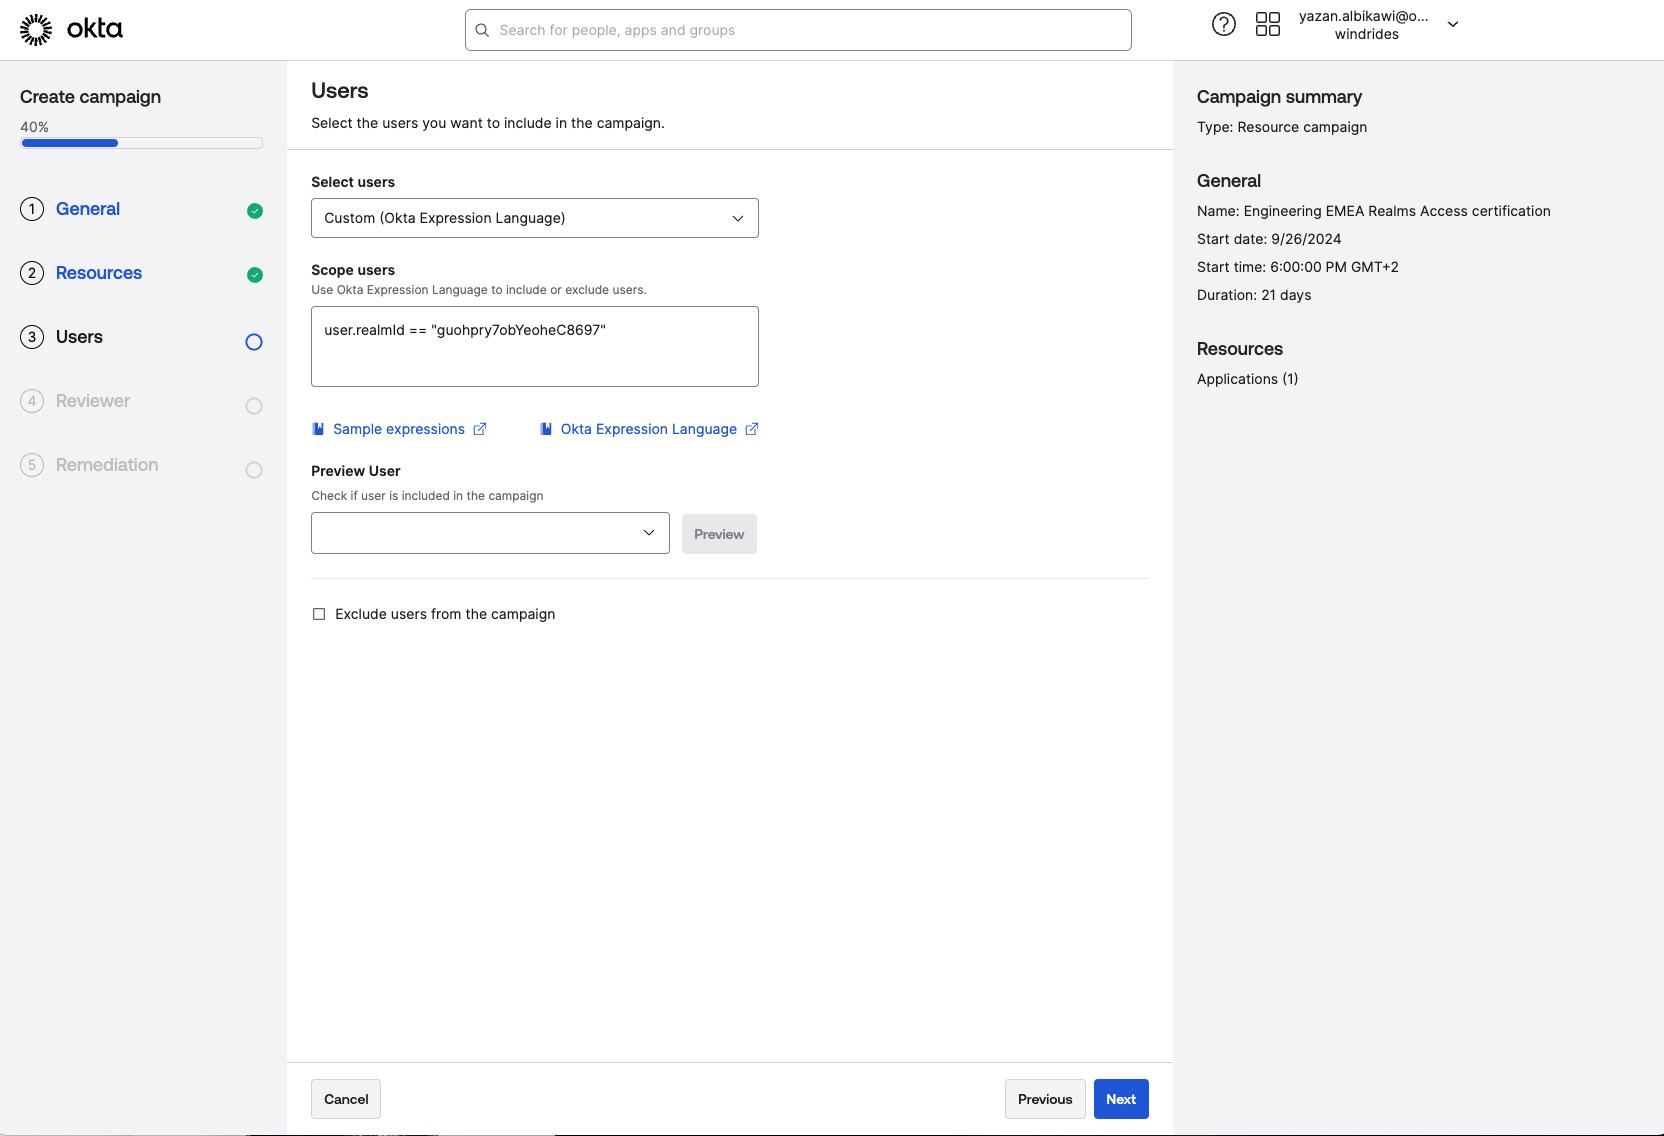
Through Expression Language, WindRides can scope the users that are included in the campaign and the reviewers of the campaign. In this example, WindRides will use Expression Language to scope the users in the campaign to the Engineering realm. The RealmID referred to in the expressions can be found via API or through the Realms URL. Here is the RealmID for Engineering EMEA as an example.
Expression Language reference for access certification campaigns
Scope | Expression | Details |
Users | user.realmId == "realmid" | Scope for single realm. Multiple realms can be defined as a part of the scope by using OR. Example: user.realmId == "realmId1" Or user.realmId == "realmId2" ... |
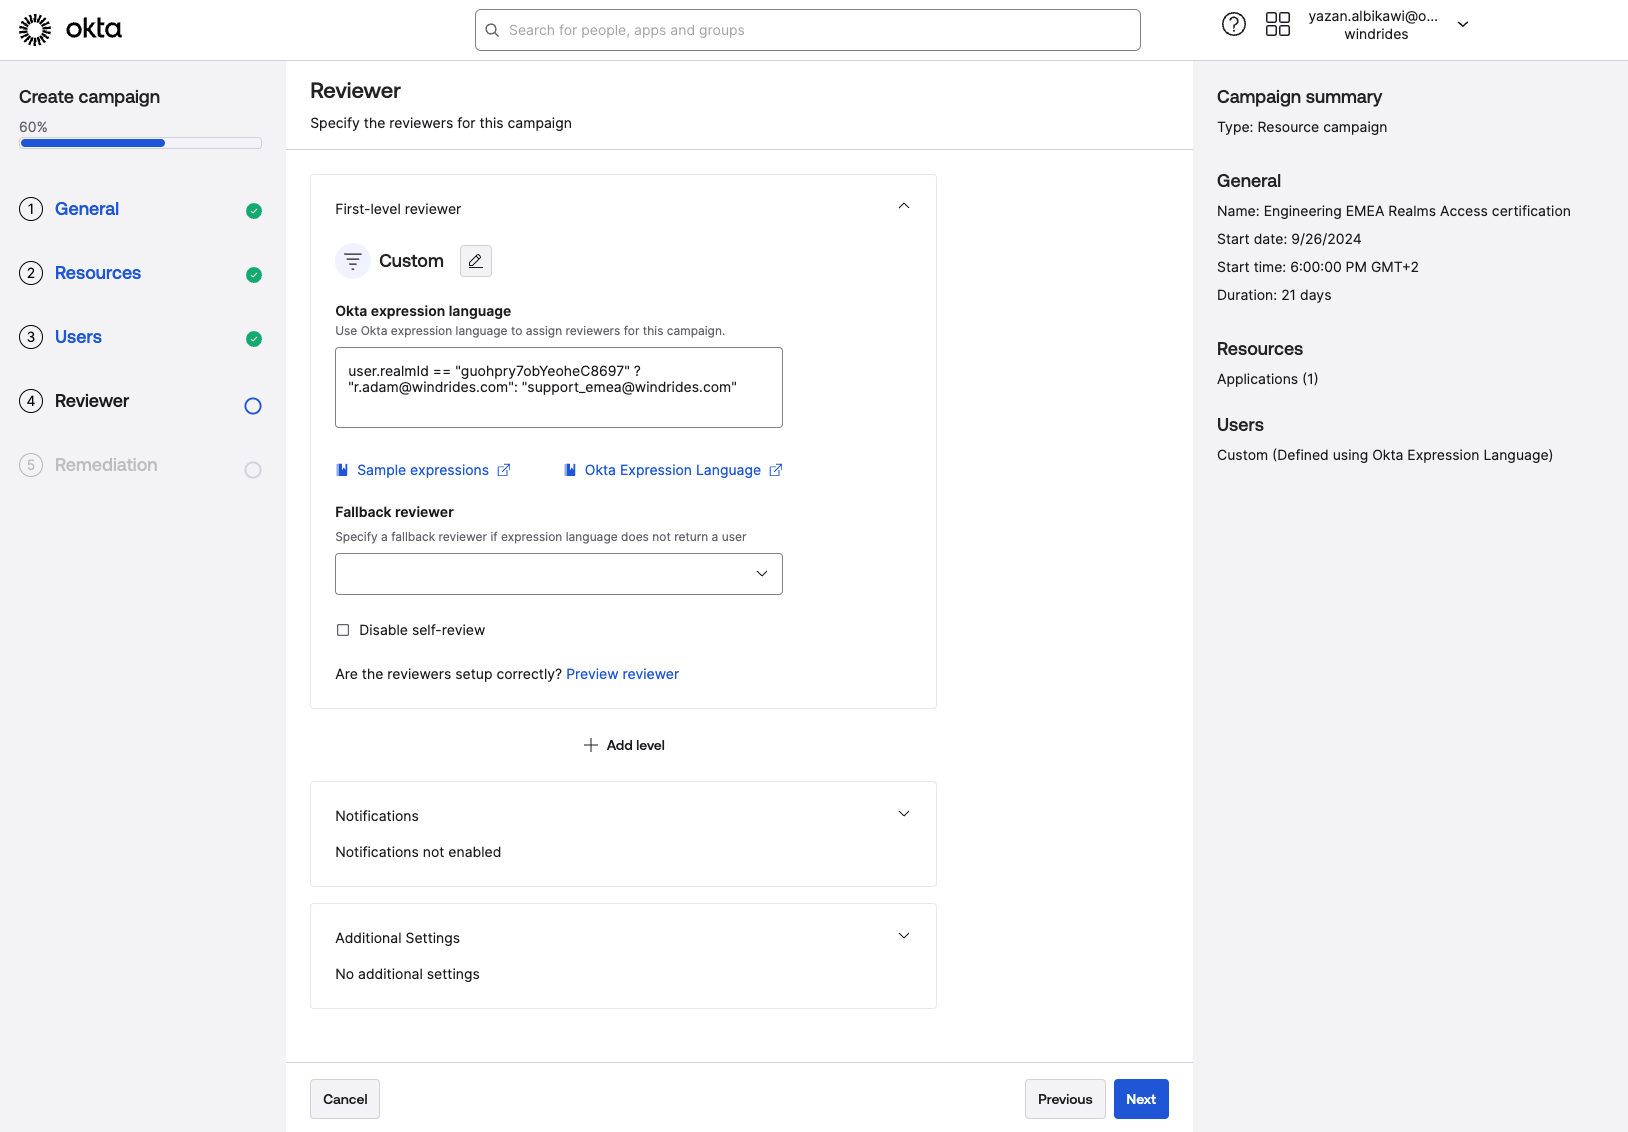
Reviewers | user.realmId == "Realmid" ? "user@example.com": "backupuser@example.com" | With this expression, the condition will check if the Realm ID for the user in scope is true. If False, the review will be routed to the Fallback reviewer. |
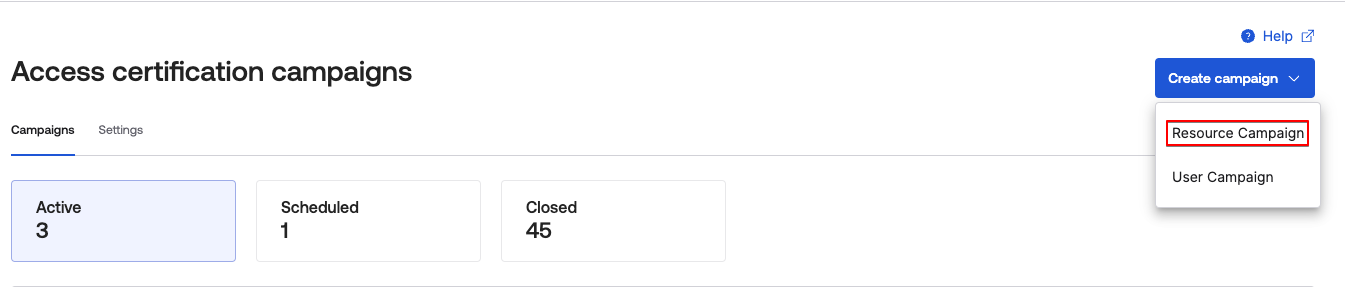
Step 1: Create Campaign
While they can run both resource and user campaigns, WindRides is interested in creating a resource campaign to evaluate application access for the Google application within the Engineering EMEA realm.
Step 2: User Scope
User Scope can include all users or a specific subset of users. Define the user scope by leveraging Expression Language.
Step 3: Select Reviewer
There are a number of options to select from to define reviewers. With this particular campaign, WindRides wants to assign the reviews to the realm admin, so we will select “Custom.”
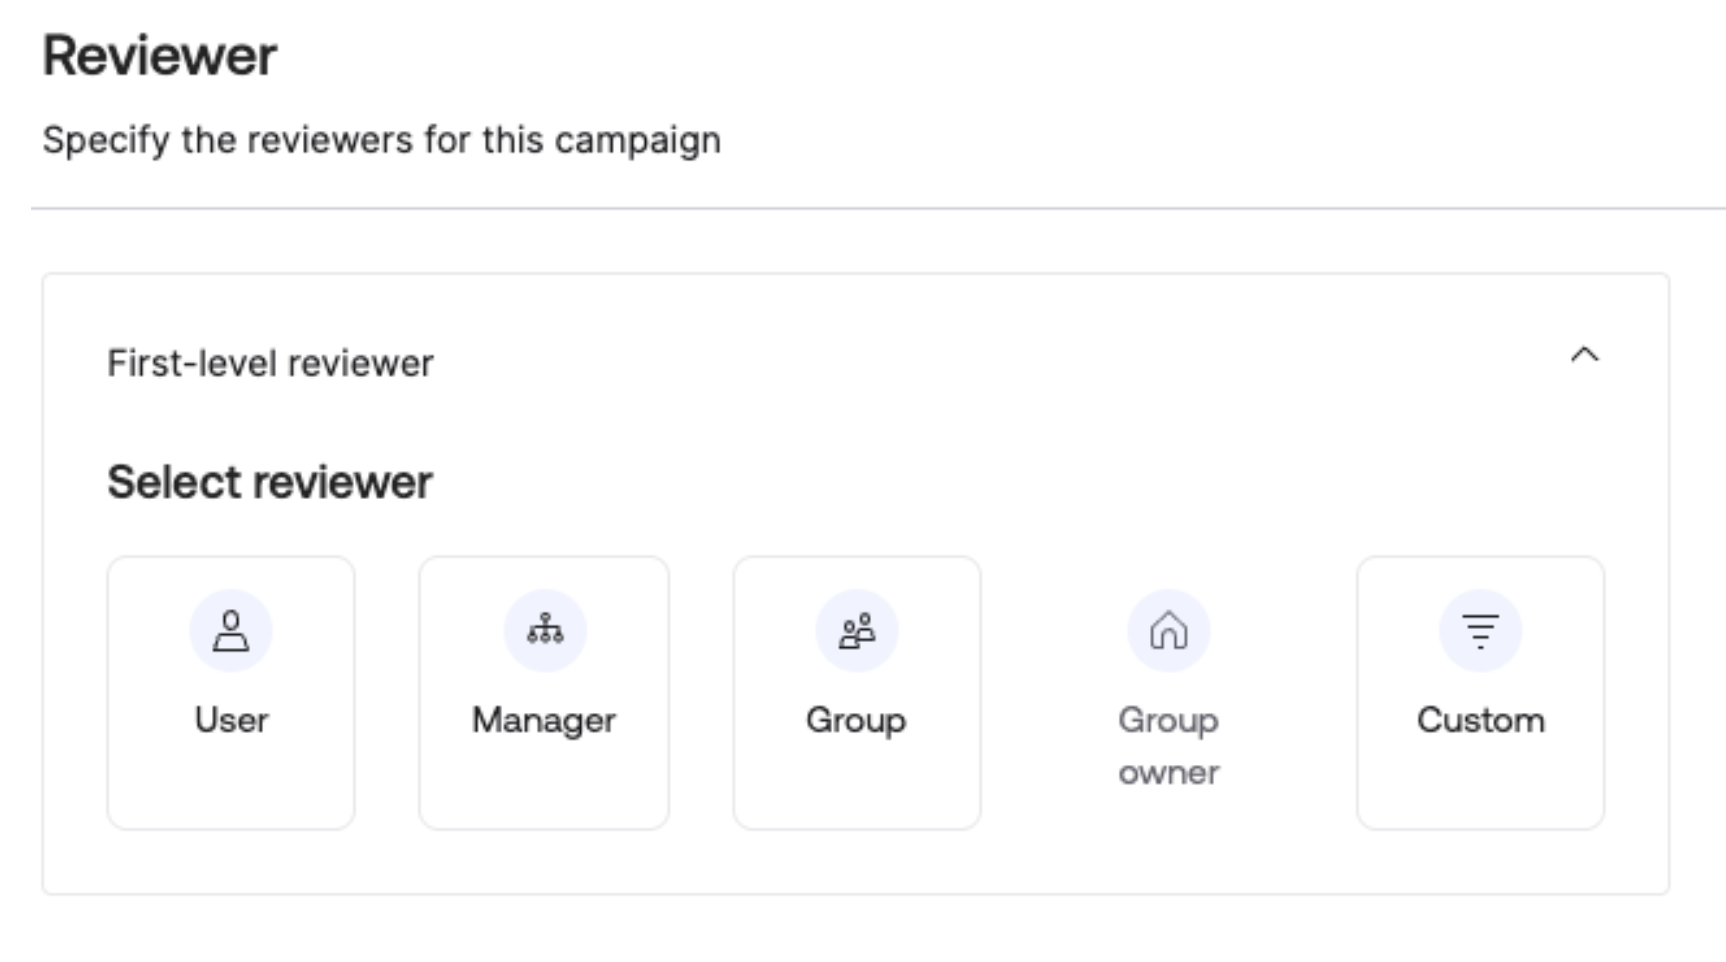
Using Expression Language, the reviewer can be defined as the user who is the realm admin. If a user is not a part of the realm defined, then the review will be routed to the fallback reviewer. The realm admin does not need to be a part of the realm they review.
Access Certification Campaign

The video above showcases how to configure the Resource-Centric Access Certification Campaign, including configuring user and reviewer scope using Expression Language.
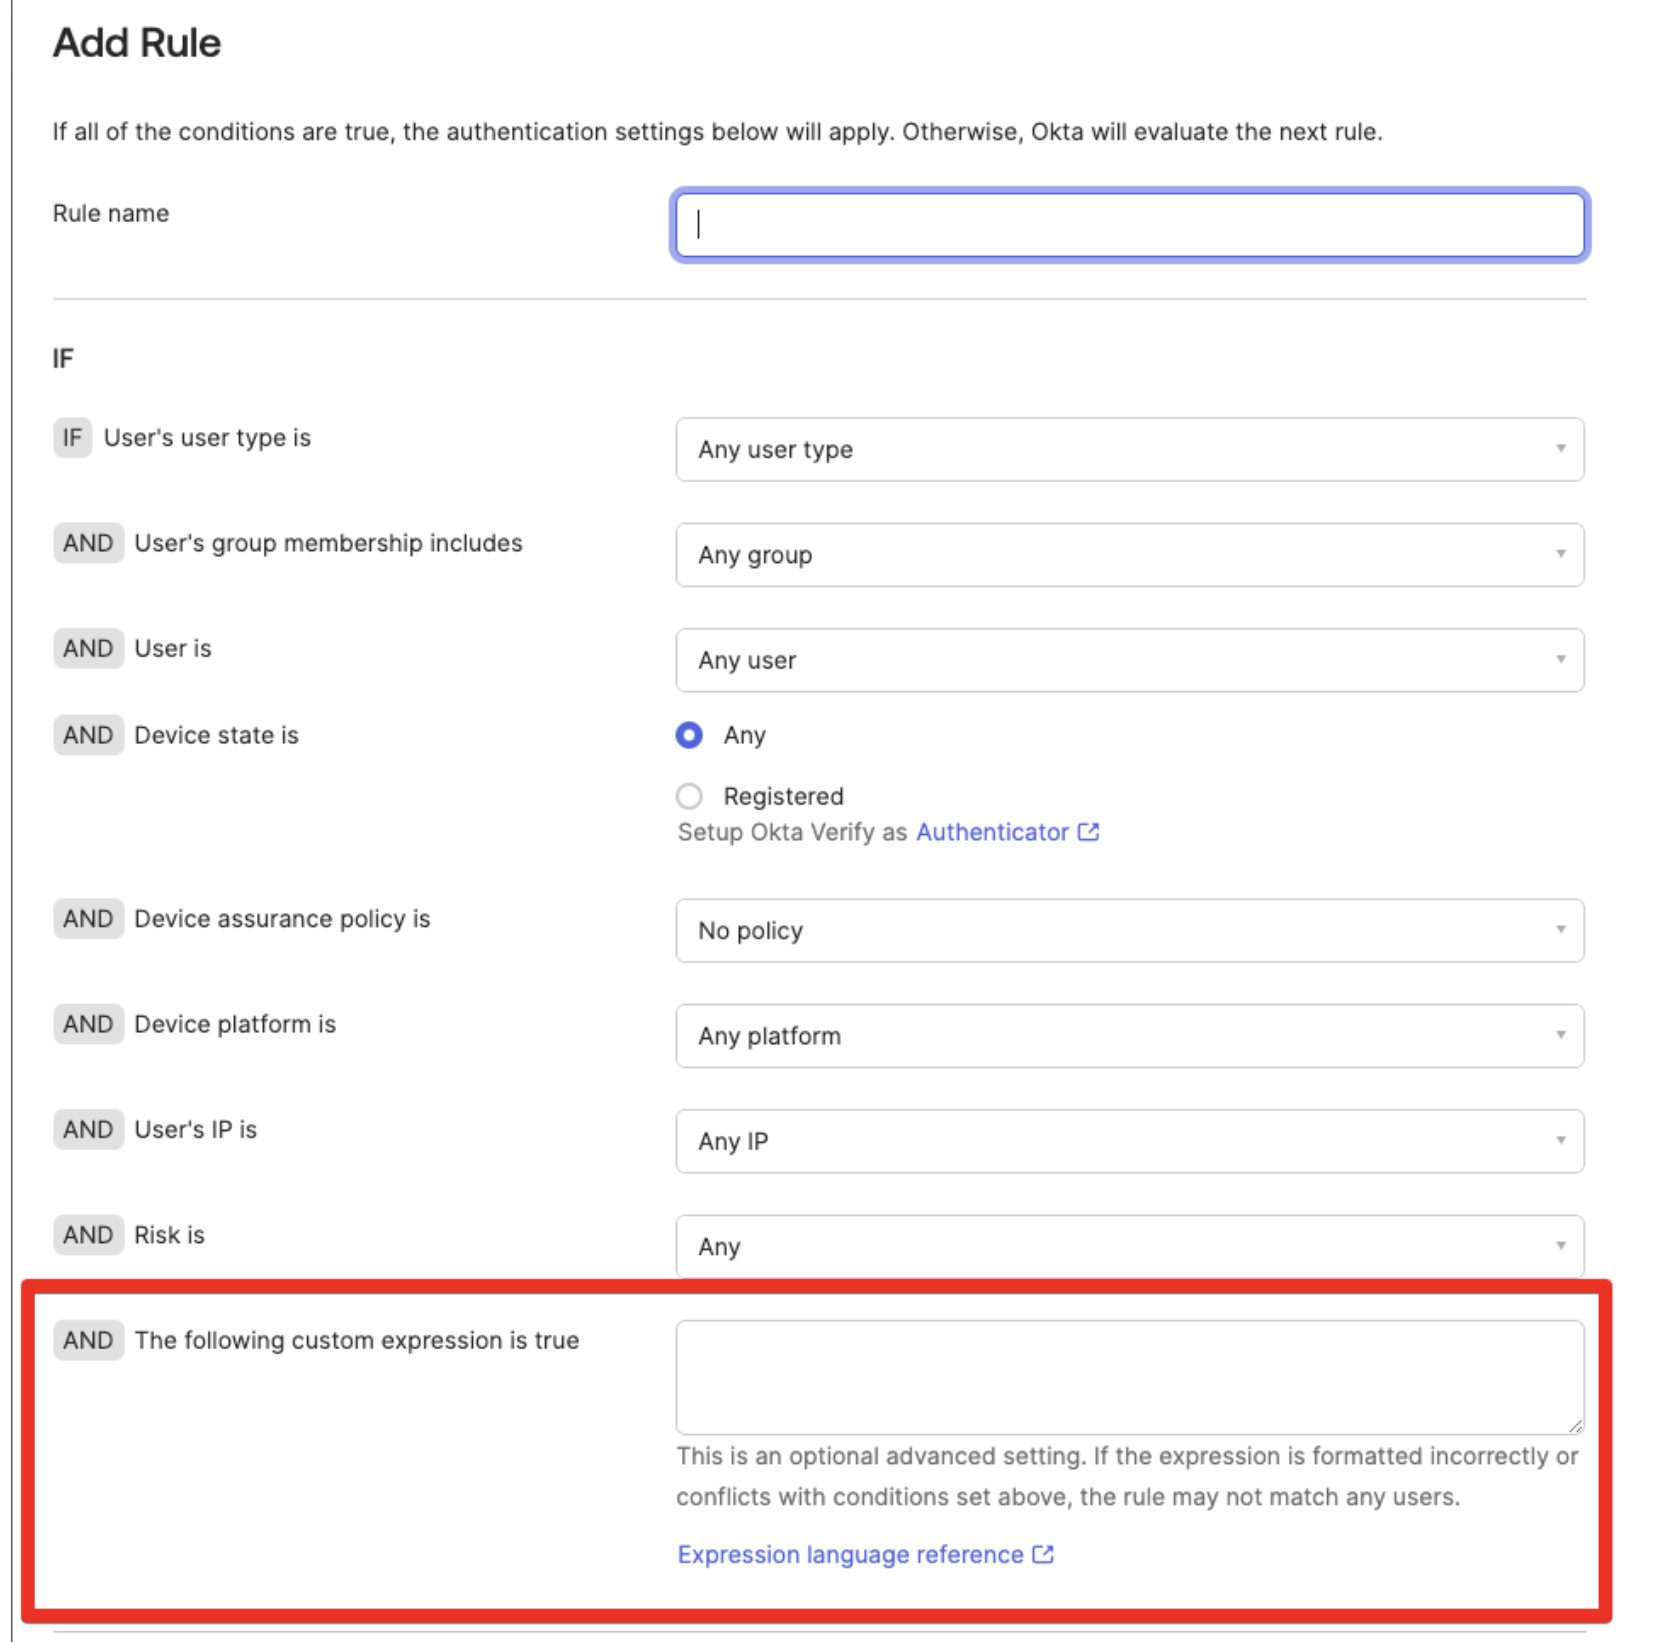
Authentication policies
Just like access certification campaigns, authentication policies leverage Expression Language to define policy rules.
Setting Up Authentication Policies

In this video, WindRides leverages Expression Language to scope specific authentication policies to users within specific realms for additional policy granularity.
Okta Realms Workflows Connection
Automation is a key part of user management, and Workflows plays a key part in automating lifecycle management. Workflows has delivered Realms cards that can help with building flows like creating and deleting realms, and onboarding users into the desired realm.
To get started with leveraging Realms in Workflows, there are two key steps:
- Authorization
- Realm action card connection
Okta Workflows OAuth Authorization grants
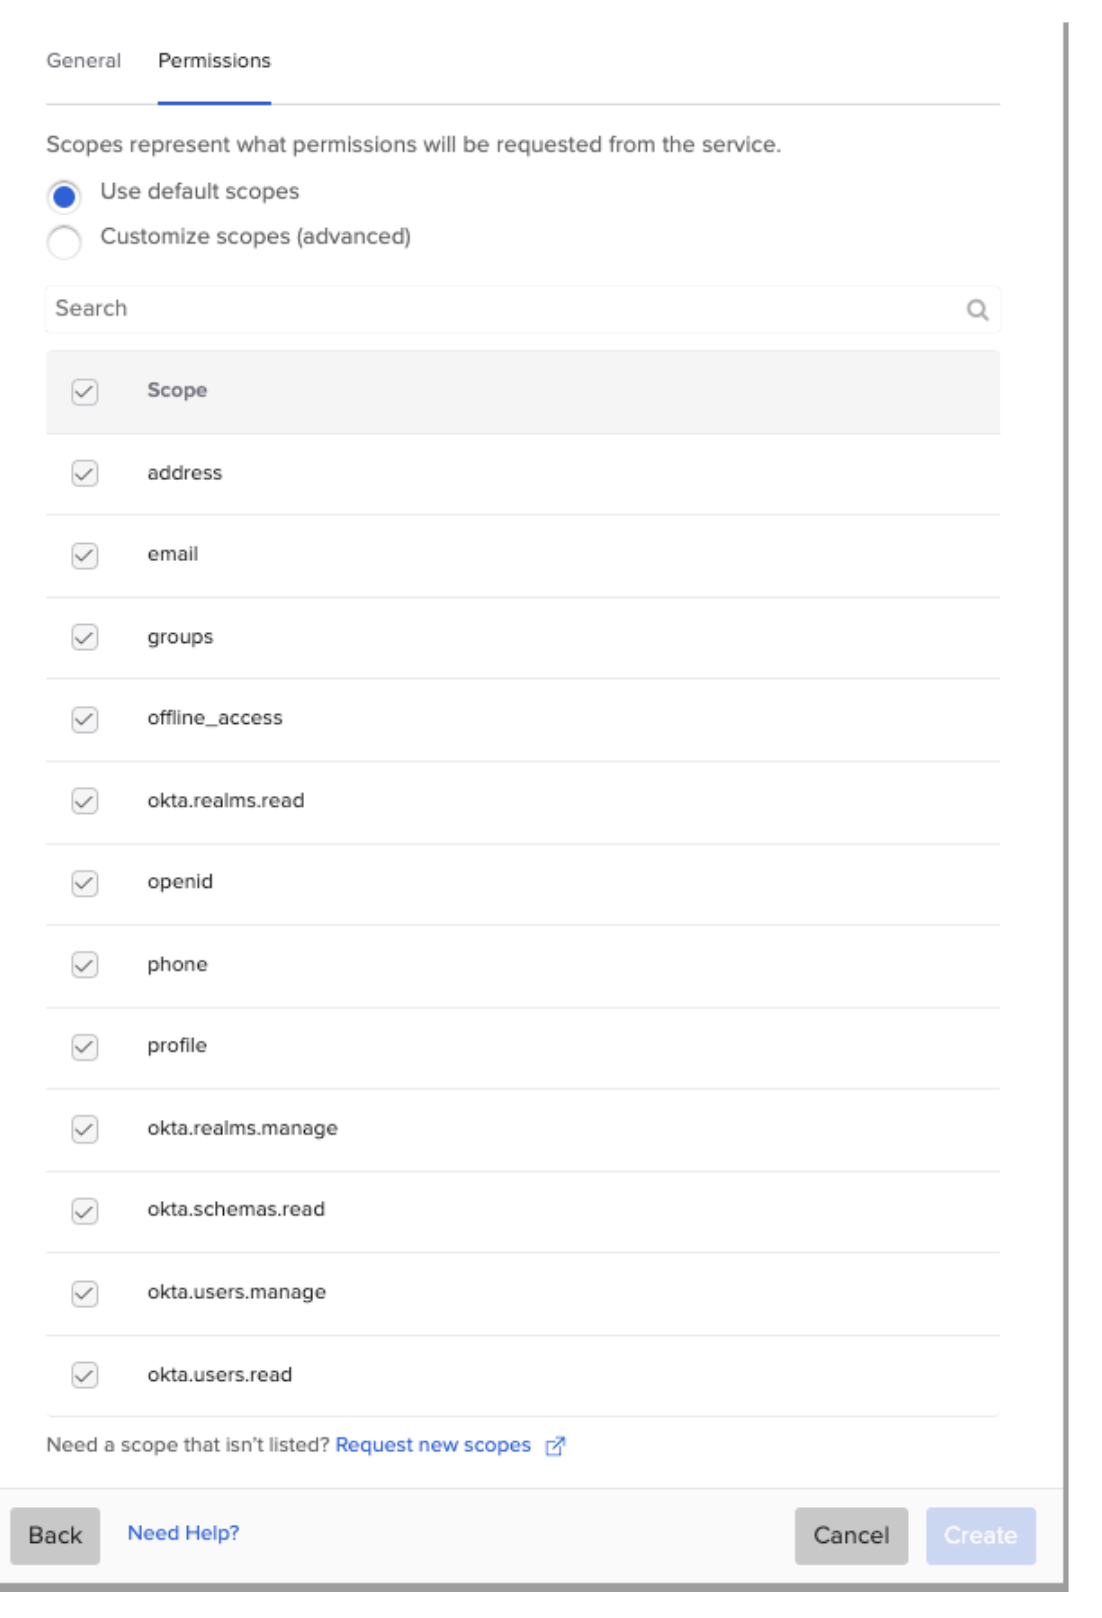
Permissions can be granted by navigating to the Okta Workflows OAuth application under “Applications,” Under the OKTA API scopes, grant the permissions below required to build Workflows on Realms.
Grants |
okta.realms.manage |
okta.realms.read |
okta.schemas.read |
okta.users.manage |
okta.users.read |
Okta Realms Connector
From the Workflows console, navigate to “Connections” and add a new connection filter for “Okta Realms.”
The permissions granted can also be validated from this view.
To add the connection, obtain the client ID and secret from Okta Workflows OAuth Application and add them to the Connection alongside the Domain URL.
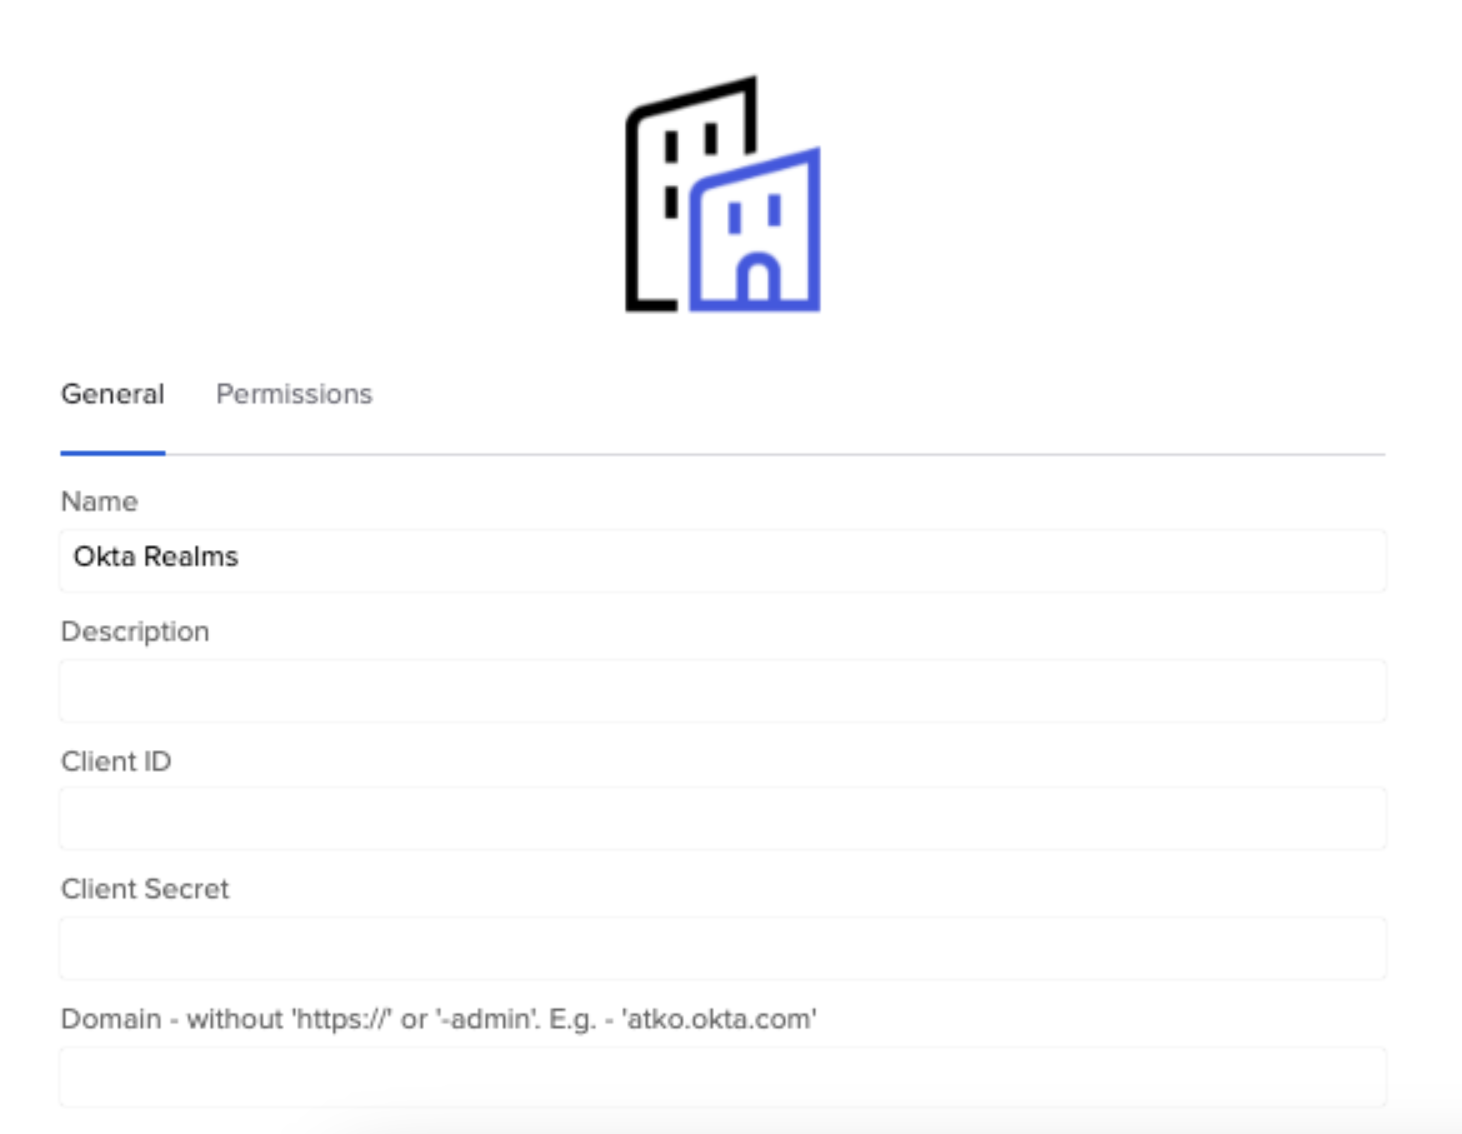
Once authentication is successful, the Actions card will be ready.
Leveraging Workflow Cards

This video shows the step-by-step process for setting up the Workflow cards.
Conclusion
With the introduction of Realms, WindRides was able to re-architect their organization to reduce the number of groups, bring different business units into a single org, and easily manage users from onboarding to delegation to governance.
As WindRides continues to expand, they can find more ways to leverage Realms to continue easing the burden on central IT teams in managing users within their organization.
More Resources
- Learn more from Help Documentation for Realms.
- Learn from Okta University Training.
Join the #okta channel on MacAdmins Slack to learn and get help from the community.


